The main two features that I will highlight most here are two abilities not found on other apps (at least apps near this price):
1) The Copilot app has an RV Mode profile. Set Copilot to RV Mode and the profile will let you pick an RV height of either 12 feet 6 inches or 13 feet. (The 12 feet 6 inches height is fine for any Roadtrek.) and it will ask if you want to route around tunnels that prohibit propane.
2) The Copilot app installs maps - either the entire North America set of maps, all of the United States, all of Canada, or just the sections of the US that you want - on your smartphone's internal memory or SD card memory. With Copilot YOU NEED NO DATA CONNECTION to follow a complete route or change route mid-trip. Download and install maps on wifi to save data usage. If you purchase Copilot USA you do not get Canada but can purchase the Canada maps in addition. I do not see a Copilot Canada only version when I look at Google Play Store. It may be available but I cannot confirm if it is.
I have been testing the Copilot app for a few weeks. The results so far surpass the Rand McNally RV GPS that sells for $399 list price, and are as good as the Garmin RV GPS that also sells for $399 list. Copilot RV mode goes one better than the Garmin as the Garmin does not have an "avoid propane restrictions" setting. A year ago I purchased the Rand McNally RV GPS and returned it after one day's use. I had it route me locally with the height restriction set first to no roads with clearances less than ten feet and then no roads with clearances less than 12 feet. It routed me directly onto a road with a seven foot ten inch height limit - no vehicles over 7'10" as posted on the entrance ramps. I know that on this road there are overpasses that are even lower than 7'. I contacted Rand McNally and they told me that they were not aware of these roads. The GPS was returned for refund. I have tried the Garmin truck/RV GPS in a store and set in the same destination for the same area - height limit set as with the Rand McNally - and it avoided those roads completely and took me on a height safe route. I then had it route me to Washington, D.C. which is normally routed on a GPS through the tunnels of Baltimore, MD. and the Garmin - with no propane setting routed through the tunnels. The Copilot so far has routed around all roads that have less than a 12' 6" height allowance and routed completely around the city of Baltimore avoiding the tunnels that prohibit propane.
In addition to an RV profile Copilot has a car profile, a walking profile, and a city transportation profile for routing. Each has options for selecting the roads and conditions that you want or want to avoid.
What else will the Copilot App do? It has turn by turn voice directions including voices that speak street names as long as you device is text to speech capable (most are). It creates alternate routes to select from when starting a route. You are able to review each route and select the one that you like best. Of course, if there is no alternate, there will be none calculated. It has lane guidance to show you which lane to be in when an exit is approaching. The display zooms to show the turn approaching. The map display on the premium ($10) version has 3D or 2D view. There are speed alerts (visual and audio that can be turned on or off) to tell you if you are over the posted speed limit. If you go off route the app automatically calculates your new route to the original destination. You can create a route with multiple stops. You can create and save a route. It has Points of Interests and these can be easily added to from POI sites like POIfactory.com. It shows direction, speed, and estimated arrival time. It also displays either the street that you are on OR the street of the next turn on the bottom of the screen. I have not found it lacking any feature that I have had on any of the stand alone GPS units that I have had from Tom Tom and Garmin. Maps are from Navtec, one of the leading GPS map providers, and ARE FREE - including updates when available. If there is an update Copilot will alert you to download the update when you want to - and you can set the app to only download when on wifi to prevent a large data download. If you get a call coming in while Copilot is running, the call screen will take precedence and come up on your phone for you to answer the call. There will be a small Copilot icon on the top of the screen and all you need to do to come back to Copilot is touch that icon. If you stop the app and do not delete the route when you start the app again, it will resume the route from the location you are at.
Now, I am sure you are saying - but what about traffic? Yes, there is traffic reporting and re-routing bu this is the only catch about Copilot. Traffic requires a data connection. For a phone this is not a problem - the data usage is not high - but you need a data connection. If you have a wifi device only - such as a tablet - you can use every feature of Copilot except traffic if you have no wifi connection to stay connected to. The other catch about traffic is that after the first year it is not free. A traffic subscription costs $10 a year BUT you get the first year free with the $10 purchase of Copilot. One other thing about traffic - if you install the FREE version of the Copilot app first and you decide to get the "Premium" version which costs $10 you must NOT upgrade from within the app to the paid version IF YOU WANT THE FREE YEAR OF TRAFFIC. The developers make no secret about this. If you want the free year of traffic then purchase at the Google Play Store or ITunes the Premium Copilot app and download this app onto your phone - uninstall the free version first - and buy the app and install it. This is the only way that you get the free year of traffic service. If you update from within the app you get all of the features of Premium BUT NO FREE TRAFFIC. Traffic service will then cost you an additional $10 for the first year. This all seems odd but this is how they do it. Traffic works well - if there is traffic to be routed around, a screen comes up and asks - will show you the new route if you want - and lets you decide if you want to remain on the route into the traffic or take the traffic avoidance route - it will tell you how much time you will save on the new route.
I just talked about a FREE version of Copilot - so why not just get and use the free version. You can - and you will get some of the features that I have been describing. The free version is referred to as Copilot Standard. When you first download this free app you are given a 14 day trial of all Premium features but in 14 days those stop. Again, let me say that the free version for the first 14 days gives you EVERYTHING free - and then if you do not update it, the free version will lose some of the features. Maps are still free and installed in memory - no data required. Interestingly, it appears that on the free version you can download Canada and the US and Europe, etc. for free. RV mode and all of the modes are there. What is not there is automatic rerouting. If you go off route on the free version (after the 14 day trial period ends) there will be a button on the top center of the map display that will say "RECALCULATE". You must click this button manually to recalculate the route. There is no traffic option on the free version - after the 14 day trial. There is no voice text to speech for turn by turn with street names directions. There is voice for turn by turn directions that do not speak street names. The free version only has a 2D display. There are other features from the premium version also missing. It is usable but compromised and for $10 for the full featured version, it is worthwhile to try the free version and then purchase the Premium version from the App Store - not from the upgrade built into the app.
Once you purchase the app it is yours and the only purchase then is traffic for $10 per year after the first year (if you follow my instructions above). The app can be moved from device to device but may be installed on only one device at a time - and another BUT, I have learned that there is an undisclosed limit to how many times you may do that. I suppose the reason why makes sense. I had planned to purchase the app and have it on my phone (with data for traffic) and then if I wanted a larger screen on a trip uninstall it from the phone and install it on my small tablet that is wifi only. I can do that but if I do it too often I will exceed the limit and the app will lock out future installations and pretty much you have lost the app unless you purchase it again. If you do this only when you get a new phone there will be no problem. The limit is not just a few times but enough to allow you keep the app on your newest device. The lock out is to stop pirating and is automatically triggered according to Copilot. Copilot recommends that if you want to purchase this app several times for other devices you must create a new User ID when you register the app upon installation on each device. The app developers are very responsive and have techs available to help on their website's support forum and there are forums for each version and each OS. The app is also updated when new features are added or problems found are fixed.
One word of advice. When using the app on a trip, plug your phone or tablet into the 12 volt power on the dash. On a trip of several hours or all day this will drain your phone's battery. It will not do that any more or faster than watching a movie or playing a game but any app that uses the display full time (there is a battery saver mode to shut off the screen) will use up the phone's battery. And it is important to save your battery in the event you need to make an emergency call.
Here are some photos of the app in use -
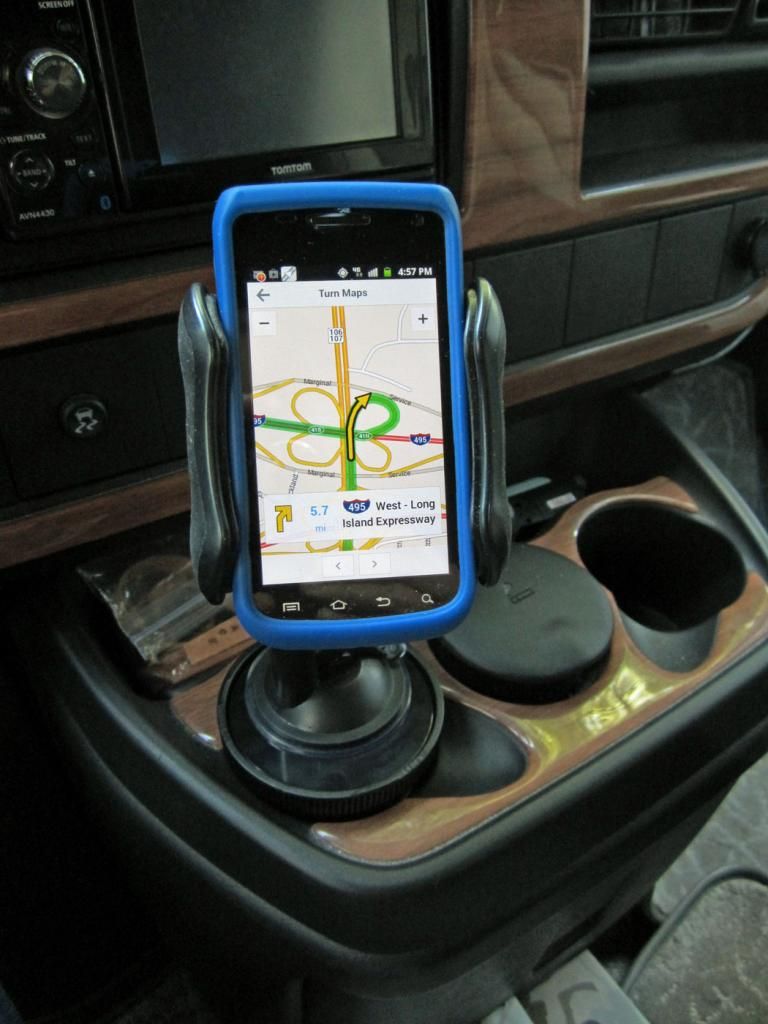 |
| Routing Screen showing calculated route |
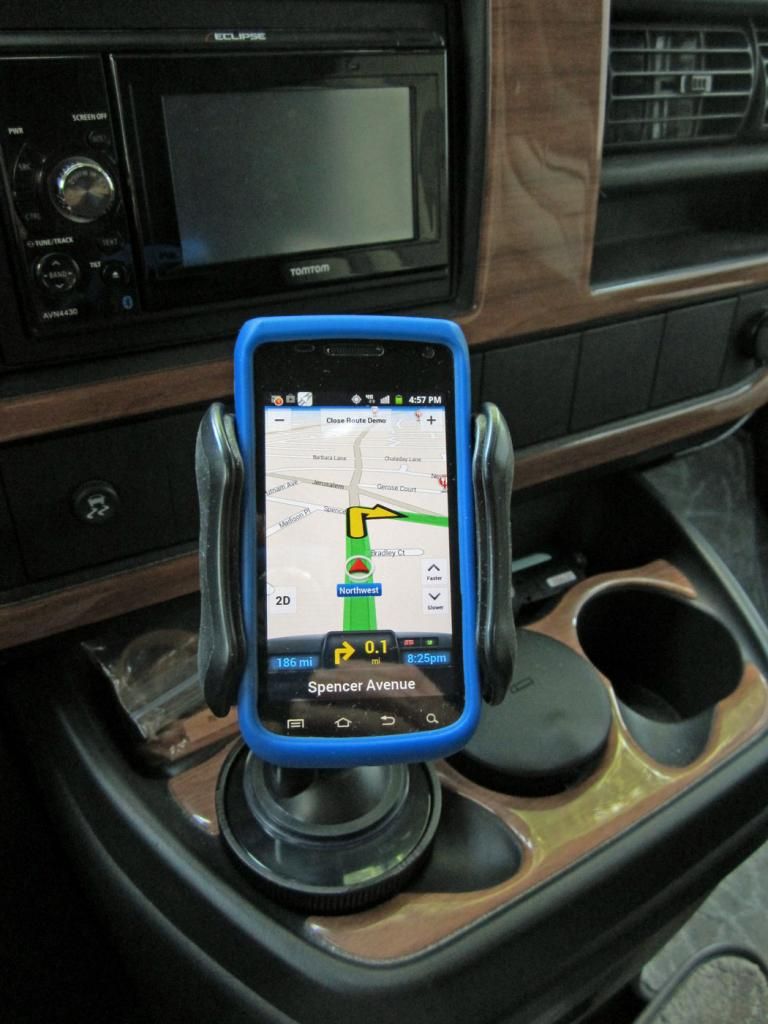 |
| Right Turn Ahead on Spencer Avenue |
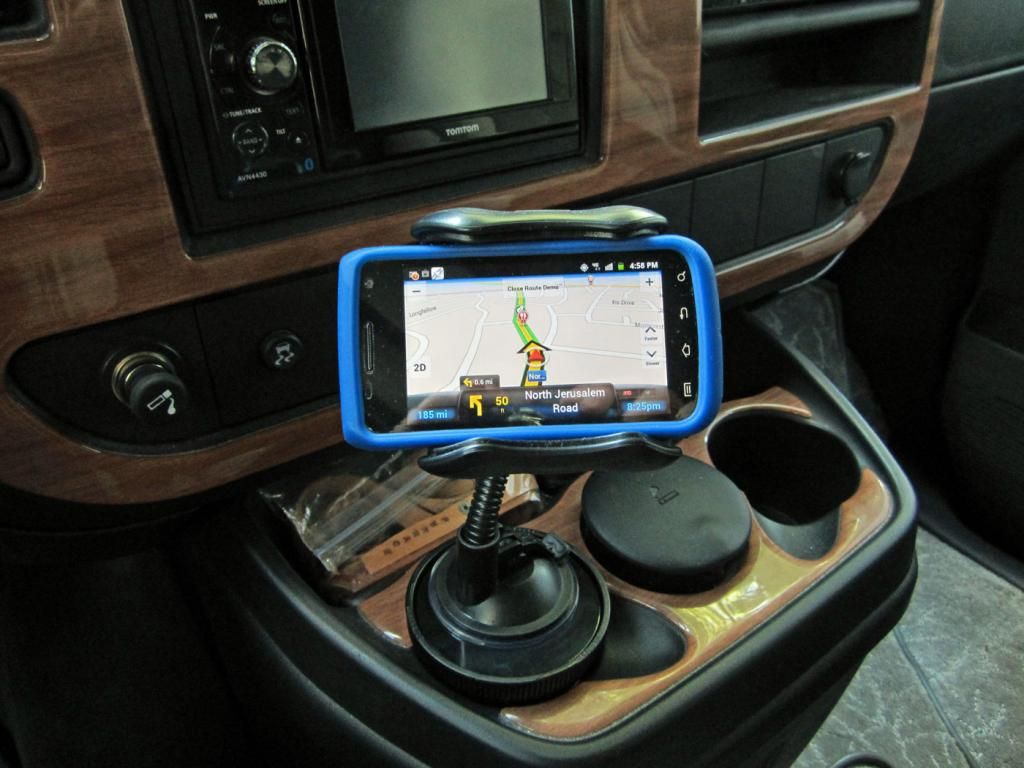 |
| Portrait or Landscape Orientation |
I have my phone in a phone cradle with a flex mount that is set on a special cup holder accessory for any GPS that locks into a cup holder and provides a surface for the suction cup to strongly stick to. You can find these as separate pieces or you can find a phone cradle with a flex arm and its own cup holder attachment. Anything that you have - works. You just want to be sure your phone is easily visible without distracting your driving. A weighted dash mat works also.
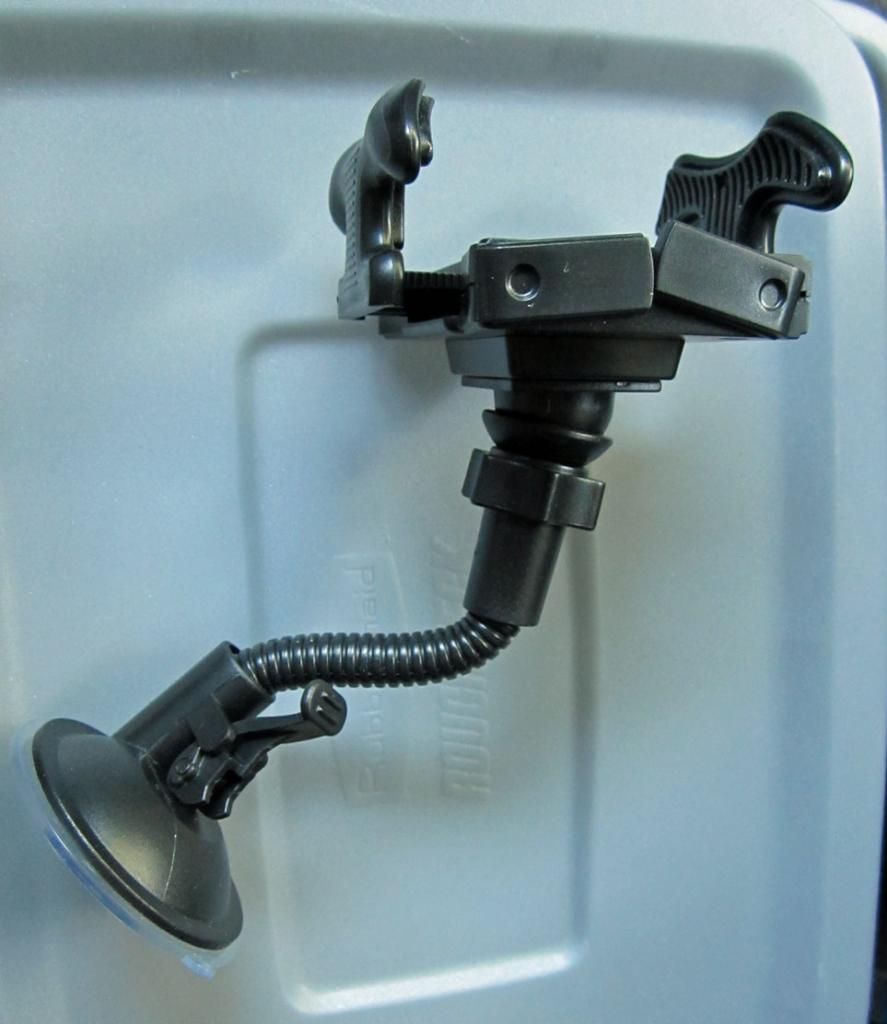 |
| Flex arm cradle |
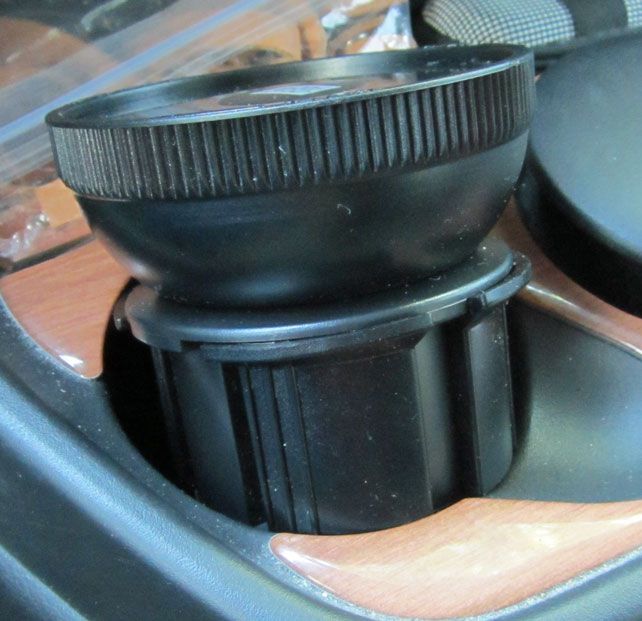 |
| Cup holder mount |
There is a website - www.copilotgps.com. Don't just take what I have to say about this app. Go to the website and look for yourself - then install Copilot Standard, the free version and try it for 14 days and decide for yourself. If you like it, buy it from the app store - remember don't upgrade from within the app or you lose a free year of traffic service. Also look for sales on this app through the Copilot website or the app stores. There was just a limited time sale for Memorial Day weekend reducing the Copilot Premium to $7.99! For Black Friday the app was $6.99 as was the traffic service renewal.